
How to make a Spring Dragon (Mod Guide)
When I first made my baby dragon pattern, the spikes really reminded me of tufts of grass or moss growing down its back. So of course, I had to make a version with flowers blooming from the spikes.
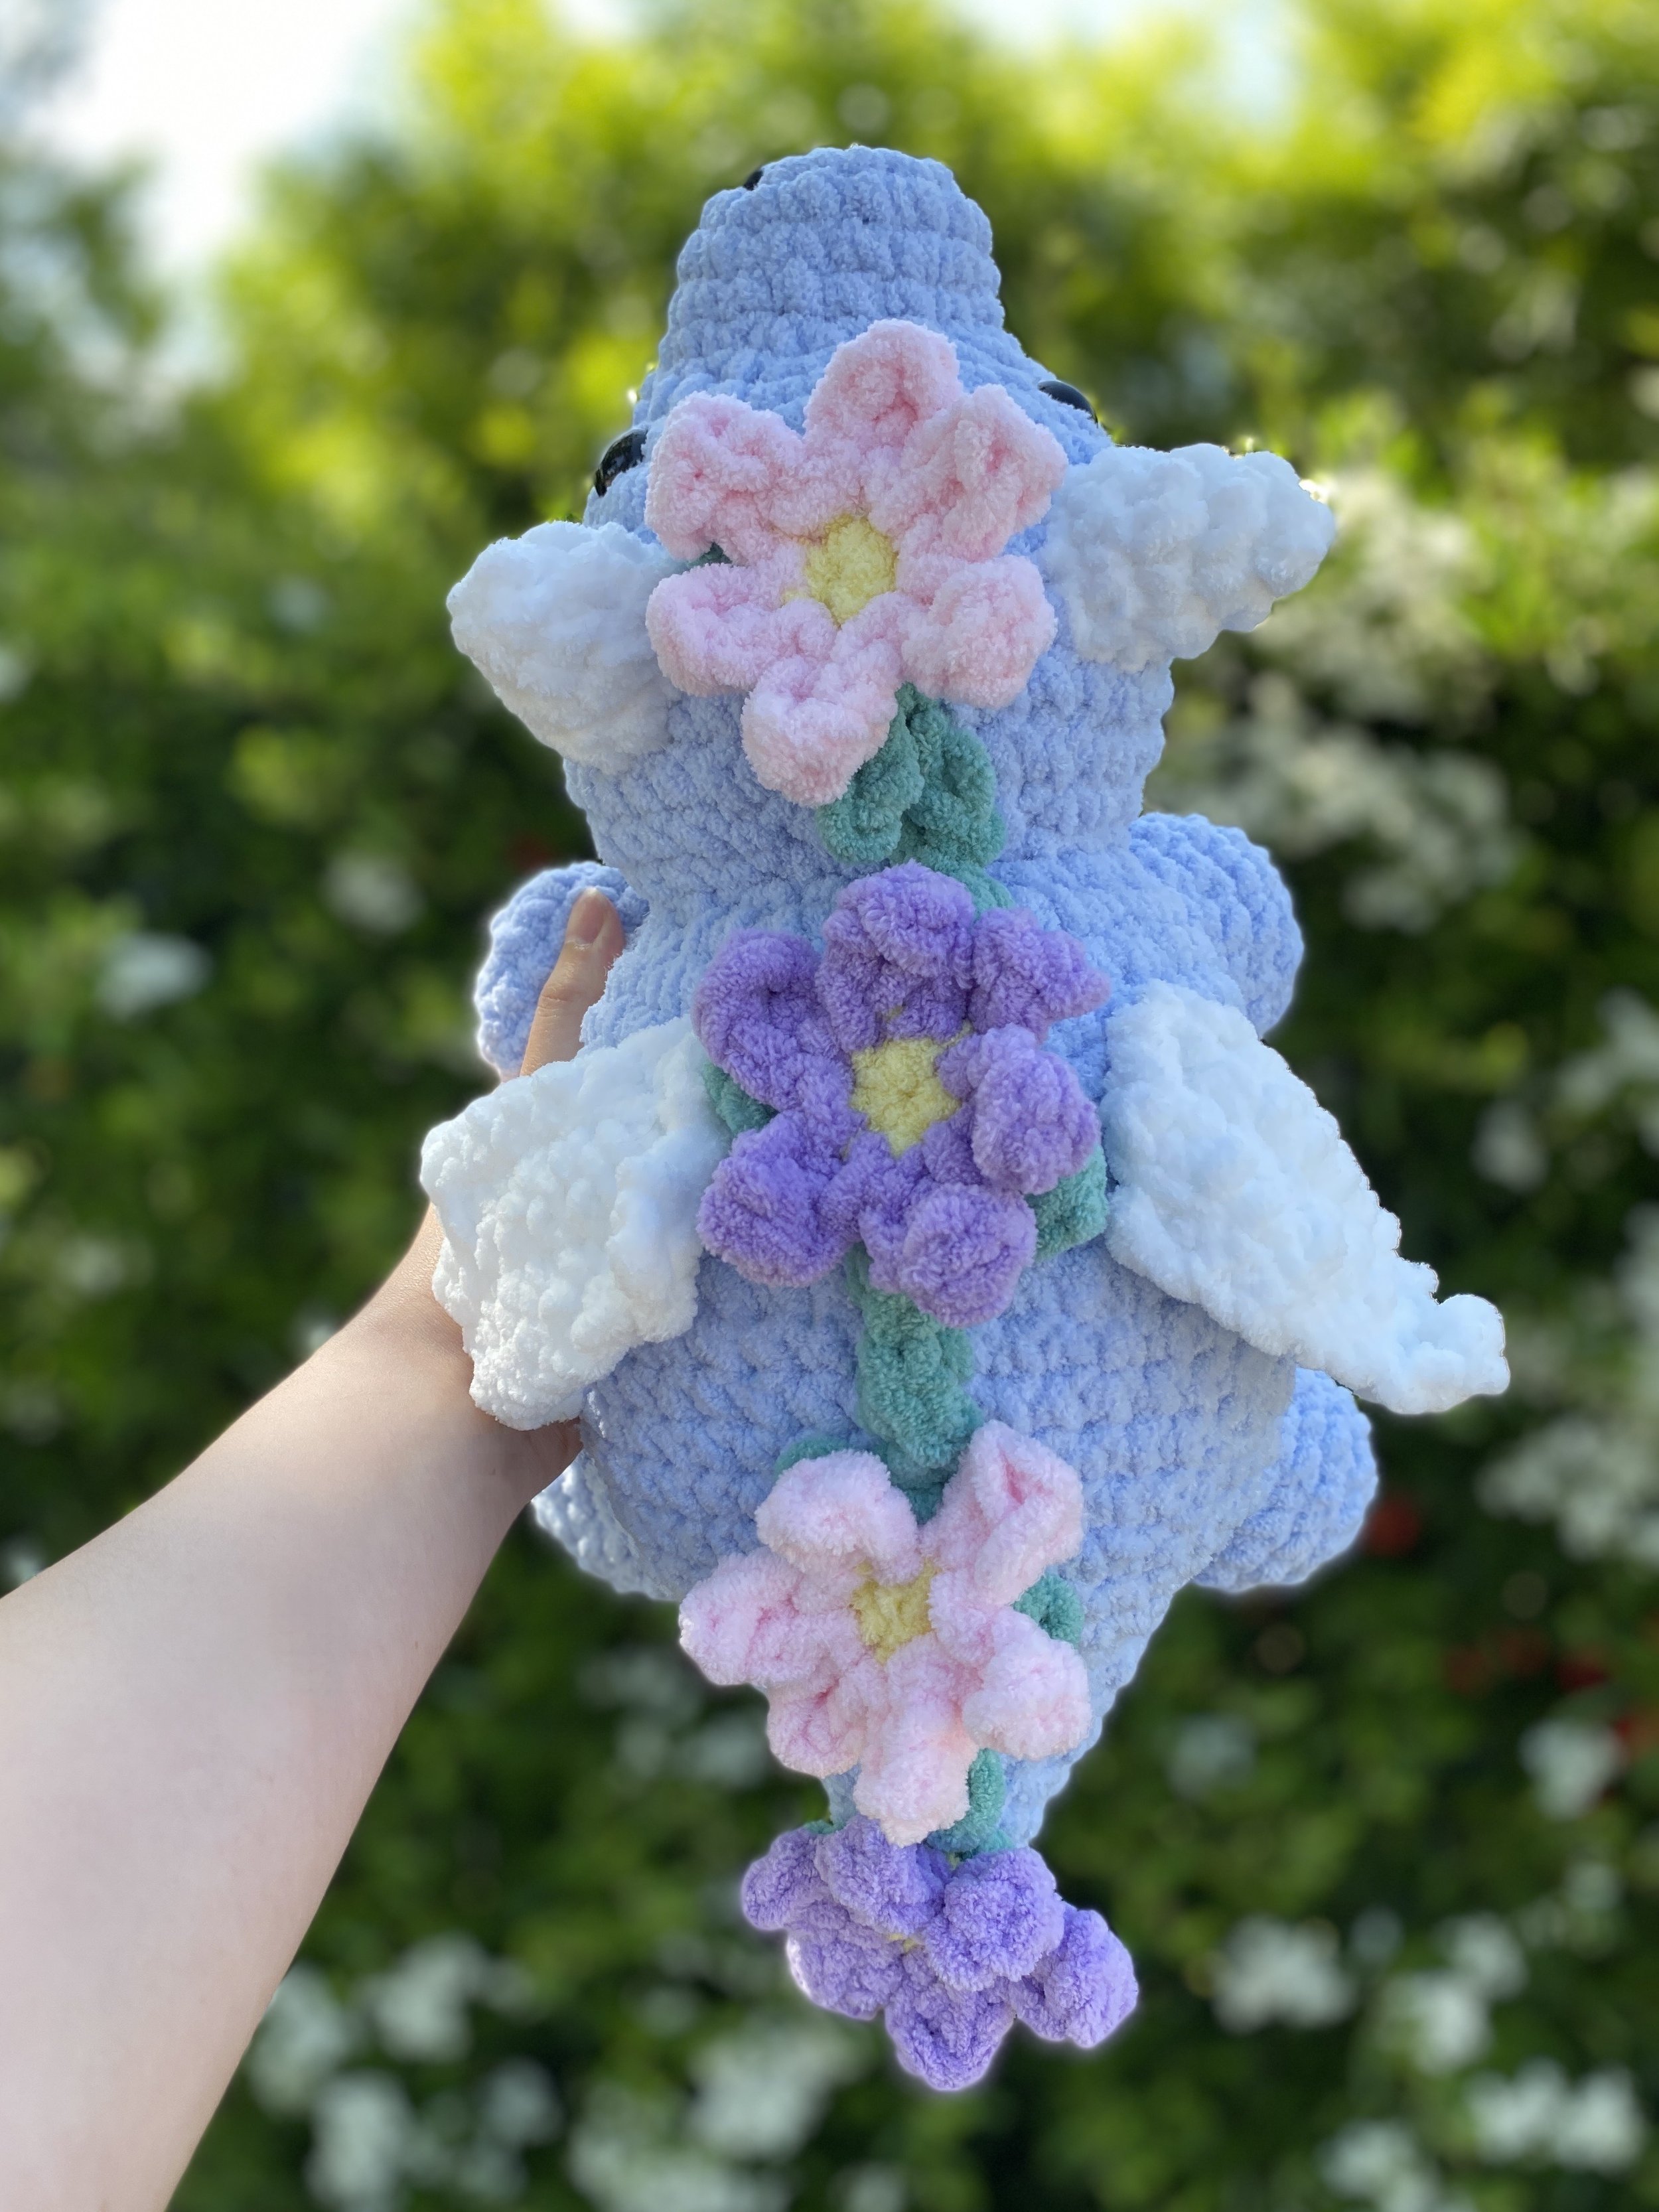
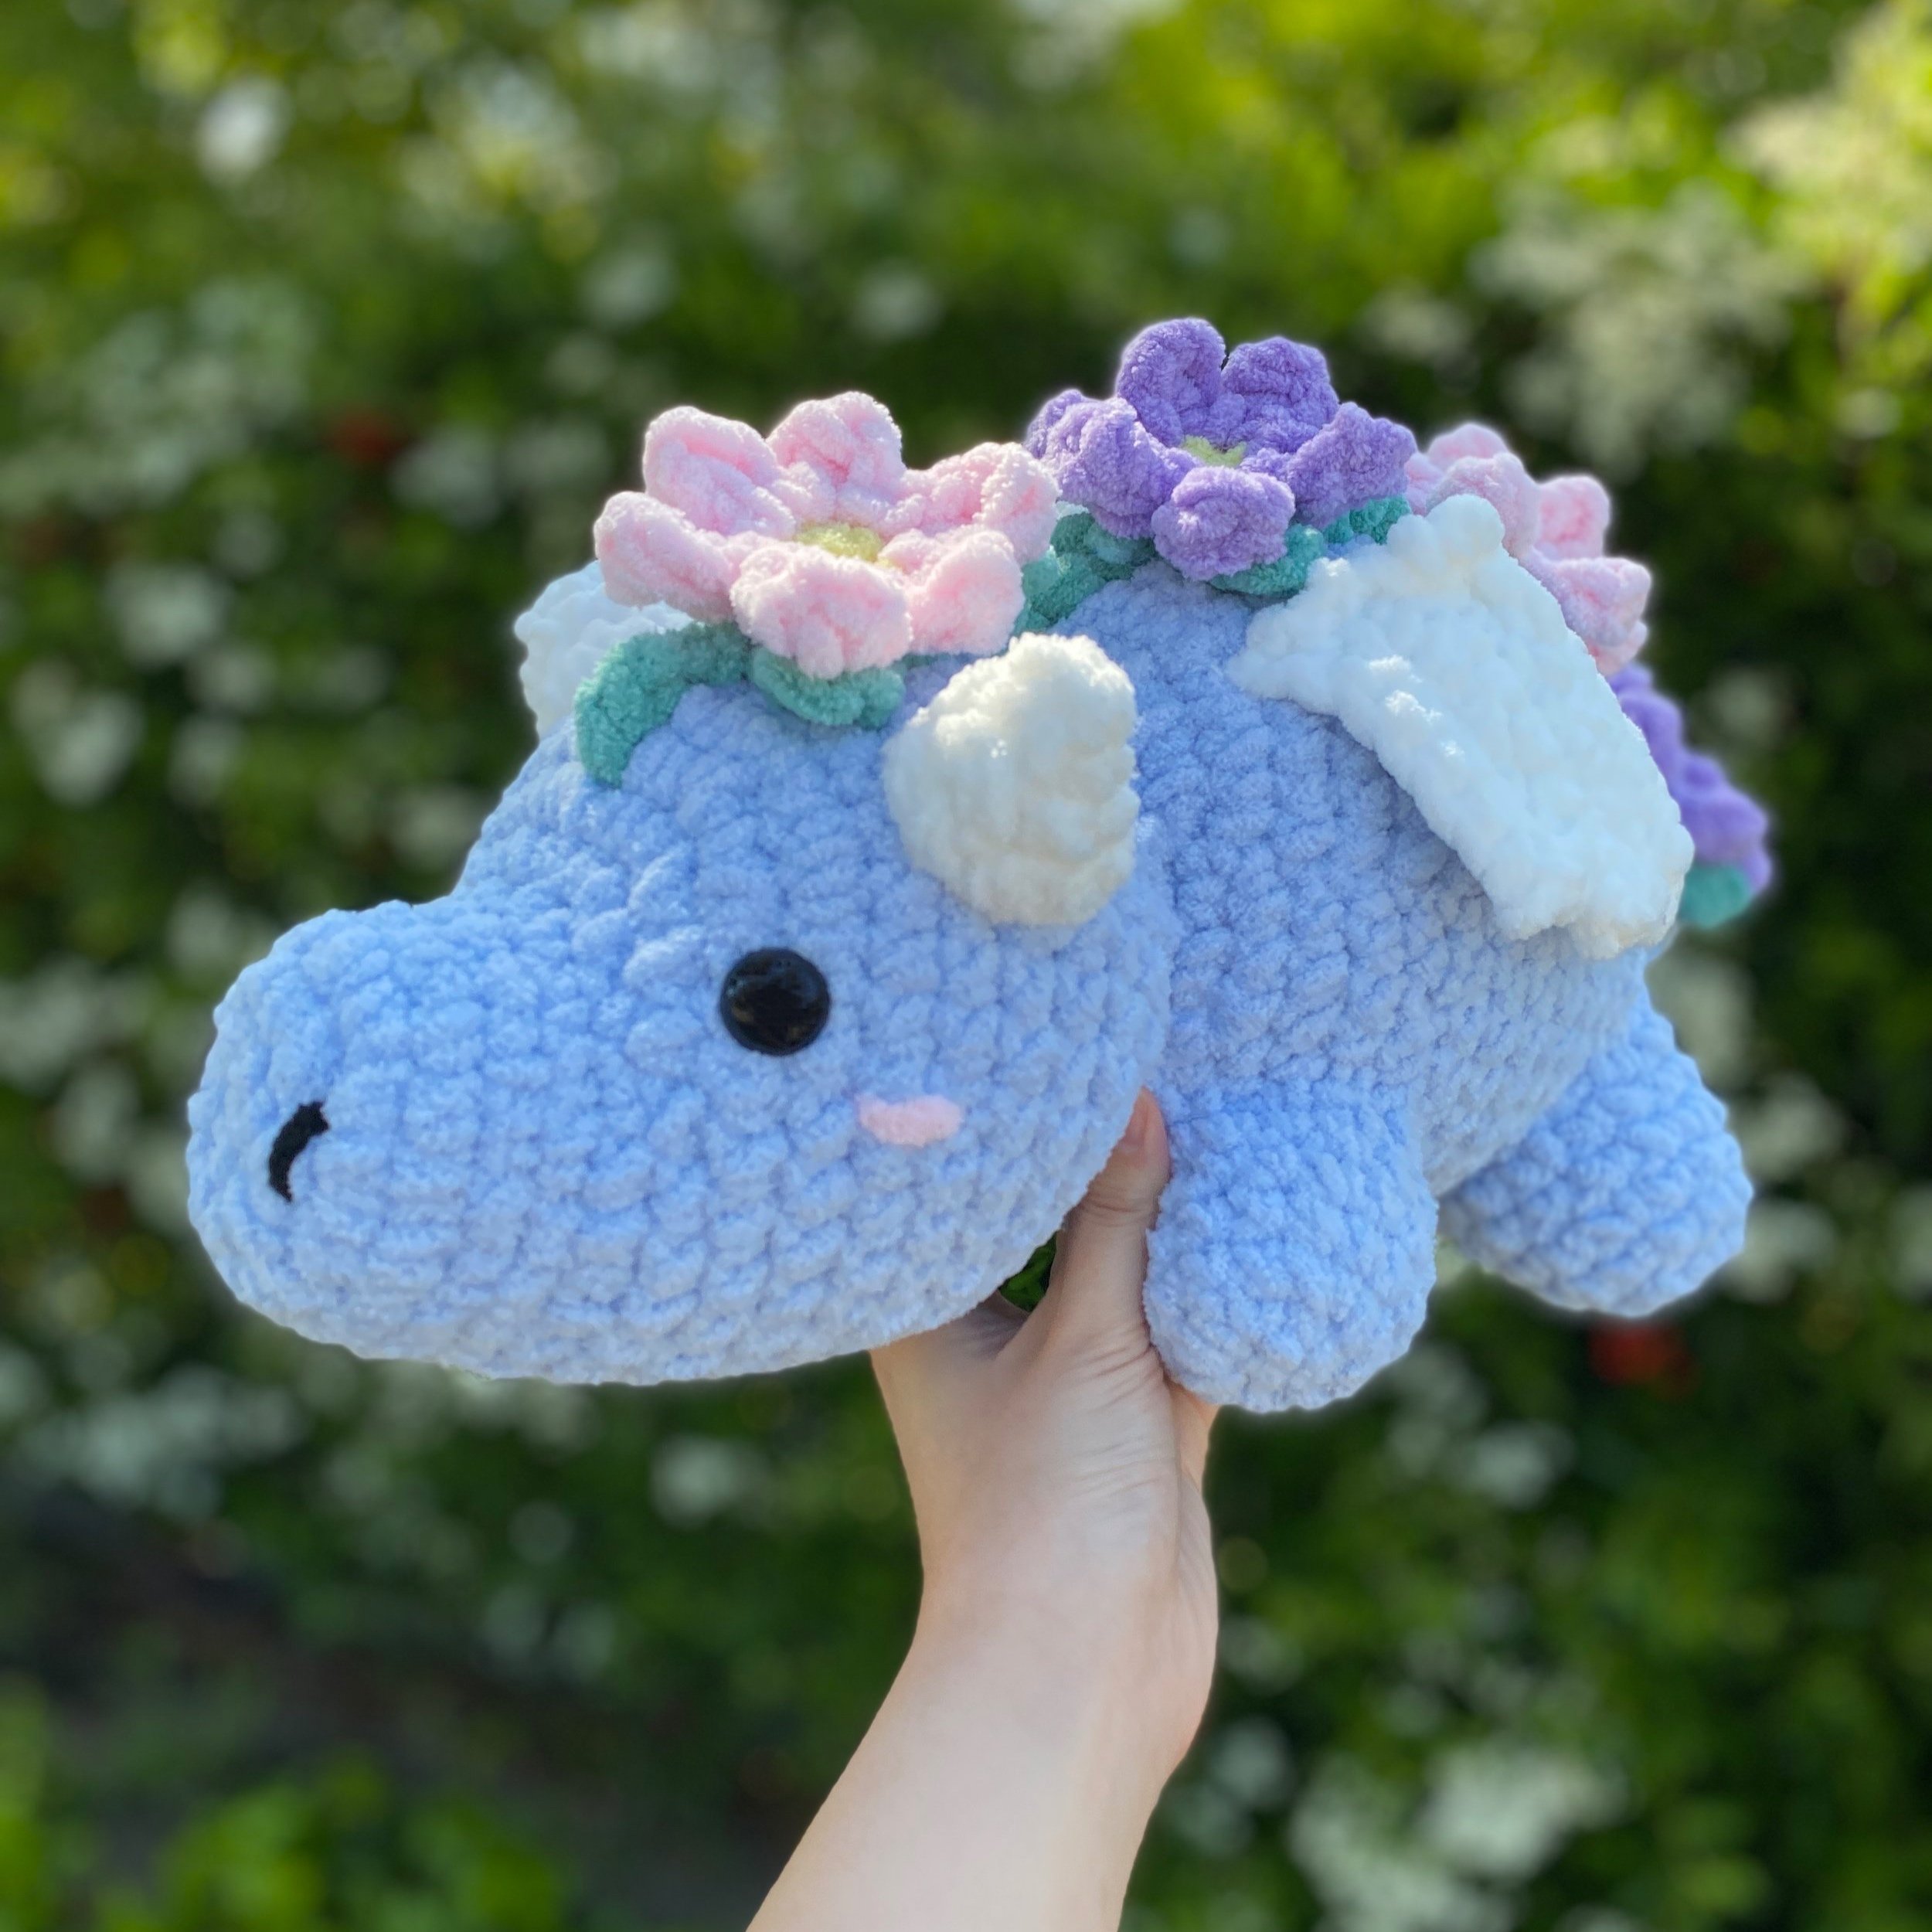
Meet the spring dragon!
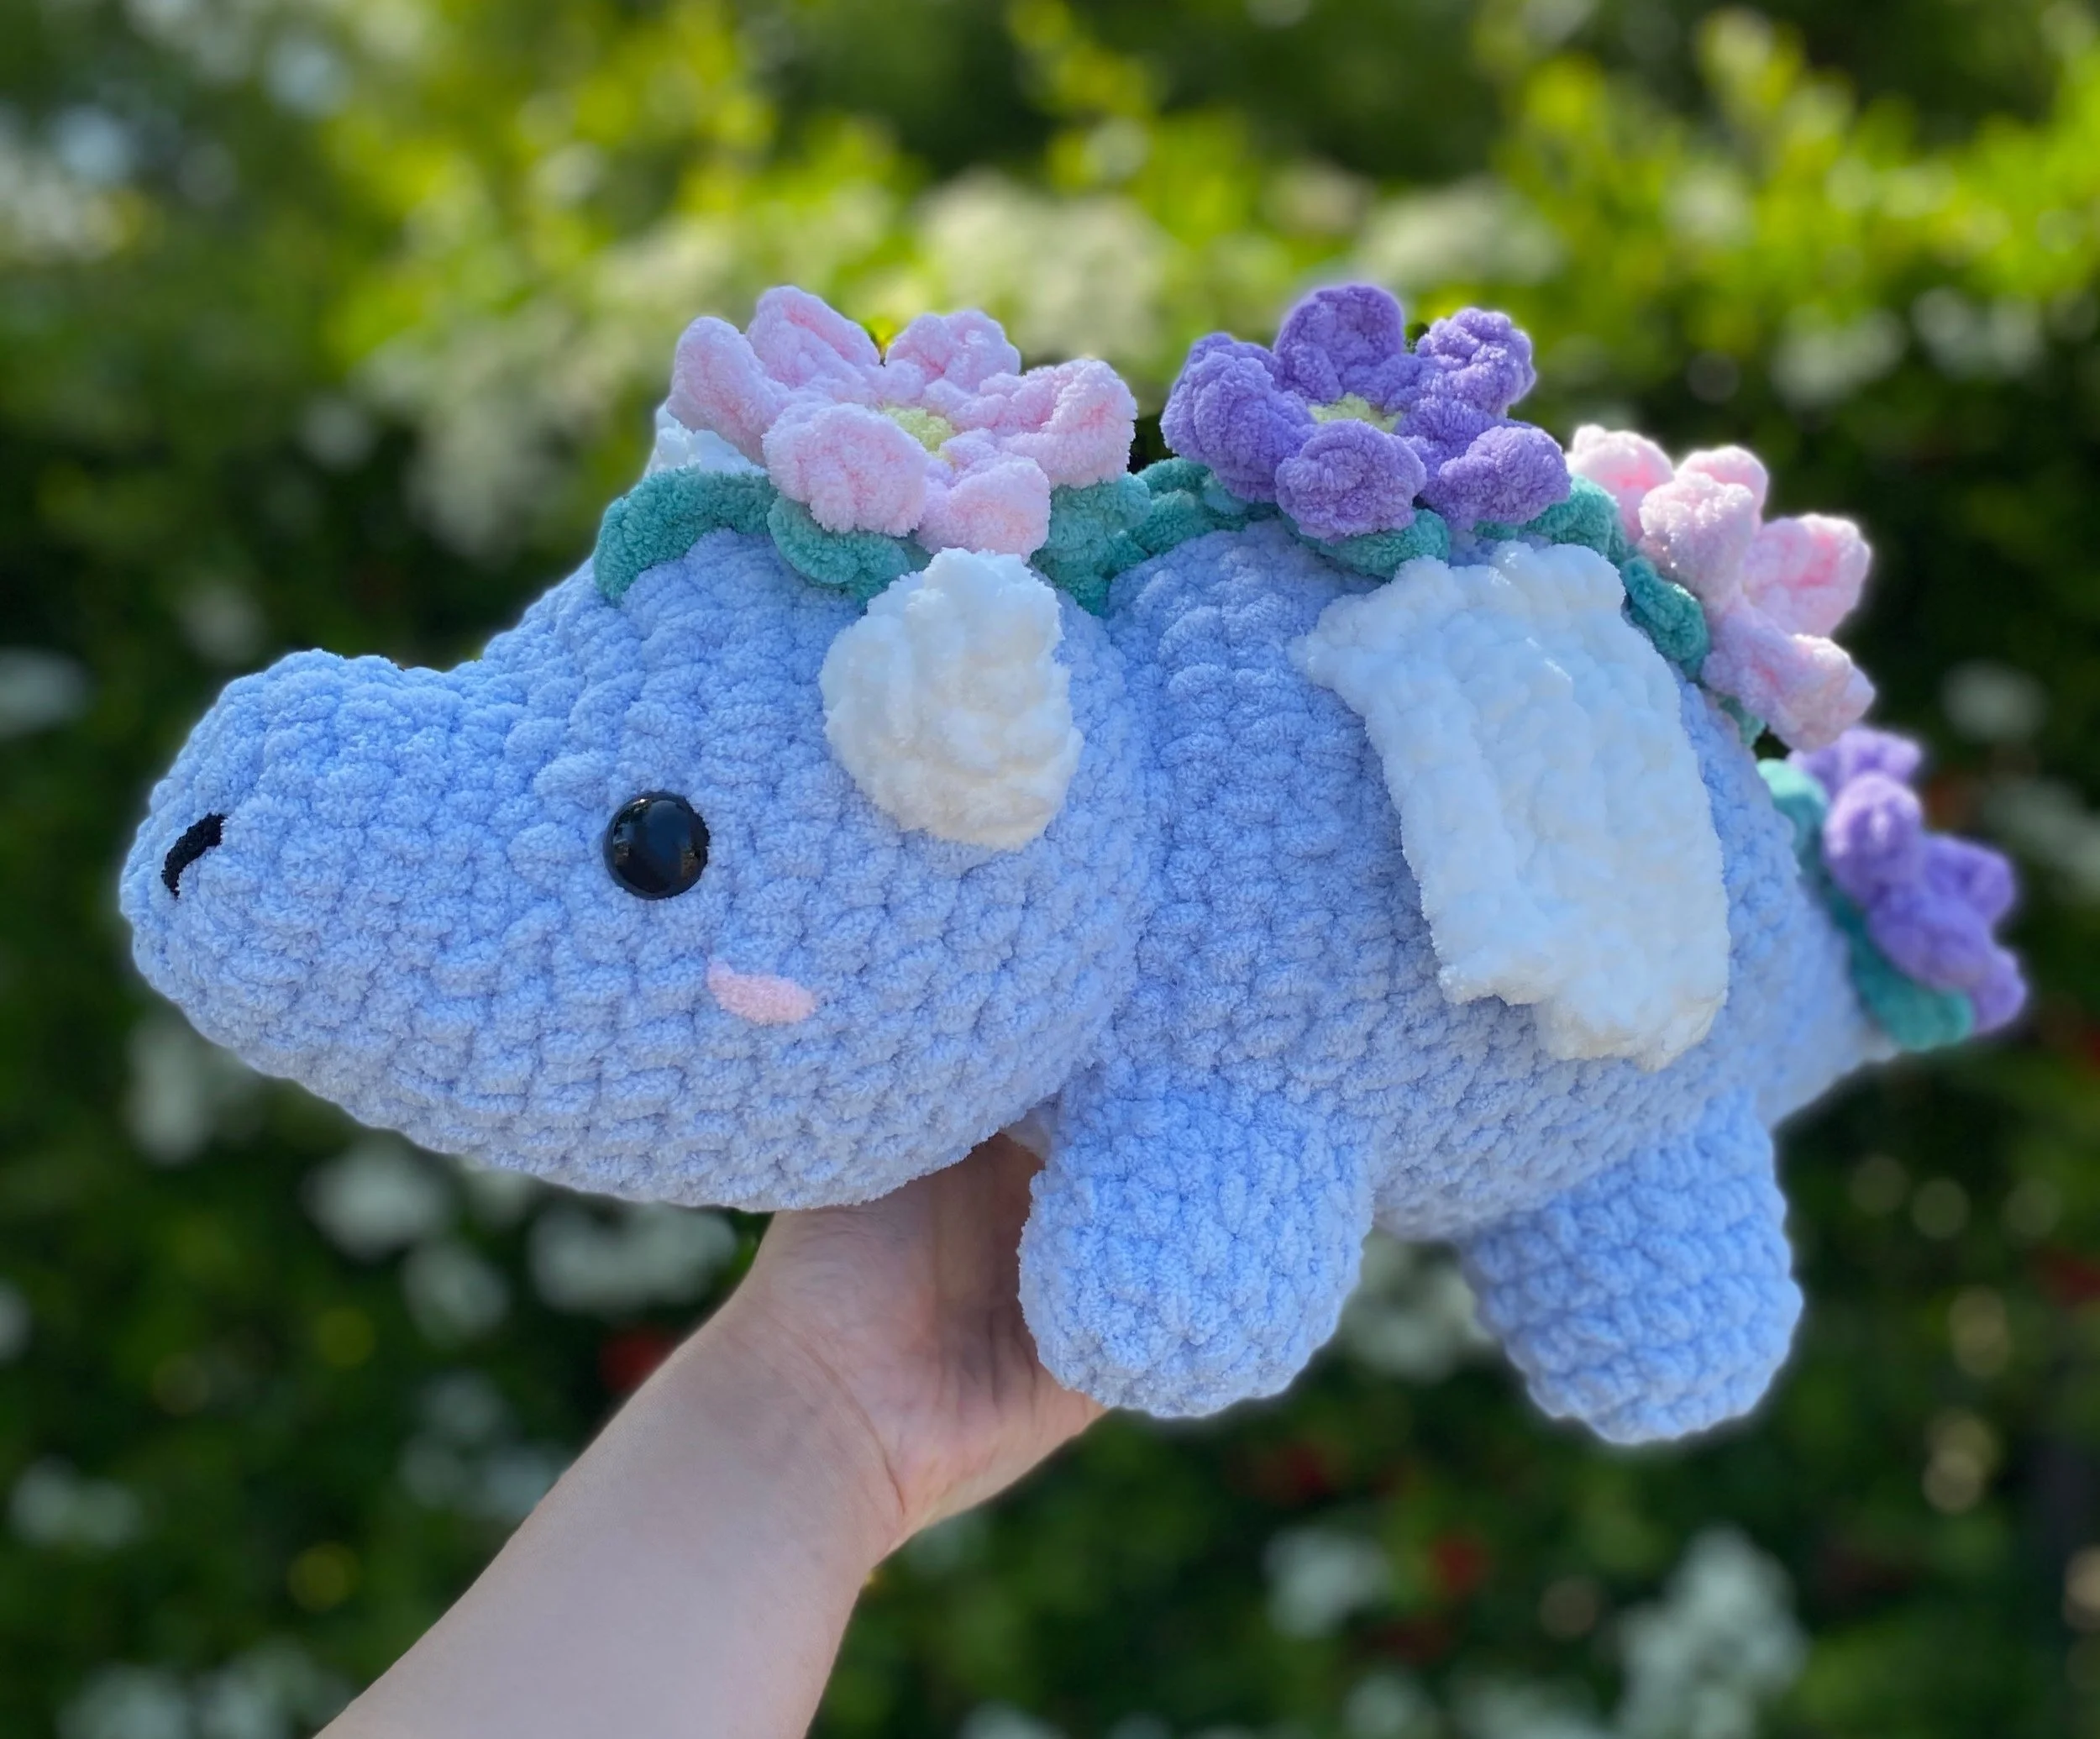
Instead of the bright green that I used for the original dragon, I wanted to use pastel colors for a softer spring vibe.
Originally, I chose blue as the main color simply because it was a spring color and I thought it would give it a soft pastel look. But then on second thought, I realized it was absolutely perfect because it’s almost like the flowers are sprouting out of ice and snow, just like how spring blooms out of winter.
Of course, you can choose whichever colors you’d like to use and you can find the modification guide below.
This is a modification guide for the baby dragon pattern. You will need the original baby dragon pattern to complete this pattern. You can find the baby dragon pattern in my shop, Etsy, or on my Patreon.
A printable PDF version of this modification guide is also available on my Patreon.
Start by following the original baby dragon pattern until you reach the spikes.
This is where the modification takes place to change your dragon into a spring dragon!
The following details how to make the flowers and adjust the spikes/wings.
Terms of Use:
Please do not copy, sell, or duplicate (to distribute) the contents of this crochet pattern in any format without permission. If you’d like to share this pattern, I’d really appreciate it if you could share where to find this blog post as this helps me continue to make free patterns for you!
What you do with the finished plushies you make is solely your responsibility.
You may sell the plushies you make using my patterns, but I’d greatly appreciate pattern credit to The Mary Jay.
Skills & Abbreviations (In US Terms)
For the modifications of this spring dragon
MR = Magic Ring
SC = Single Crochet
HDC = Half-Double Crochet
DC = Double Crochet
SL ST = Slip Stitch
INC = Increase
FLO = Front Loop Only
BLO = Back Loop Only
CH = Chain
FO = Fasten Off
Slip Knot
Change Color
Recommended Materials
For the modifications of this spring dragon
#6 Super Bulky Yarn in Pink, Yellow, Purple, and Green OR the colors of your choice
Crochet Hook in the same size as what was used for the dragon
(I used a 6.5 mm hook!)
Yarn Needle
Stitch Marker (Optional)
Pins (Optional)

Flowers (Make 4)
Using Yellow
R1: 6 SC in a MR
Change Color to Pink or Purple
R2: Work in FLO for the entire round.
Tip: Mark the Back Loop with a stitch marker to prepare for the next round
The following is made all in one stitch to form a petal:
SL ST
CH 3 and starting from the second chain, make 2 HDC. For more clarification on this section, use Figure 1 below as a reference.
SL ST
Repeat this again in each stitch for a total of six petals.

Figure 1

R3: Flip the flower over and Change Color to Green by pulling the green yarn through the loop on the hook.
Work in the BLO of R1 for the entire round.
Make a SC in the first stitch.
Make a SC in the second stitch and CH 3. Starting from the second chain, make 1 SC, 1 HDC. For more clarification on this section, use Figure 2 below as a reference.

Figure 2
Make a SC in the third stitch.
Repeat the above steps in R2 (written in green).
SL ST into the first stitch of the round.
FO leaving an EXTRA long tail for sewing. This tail will be used to sew on the flower and to make the spikes in between the flowers.

Here’s what the back of the flower should look like! You can choose to weave in the ends of the extra yarn tails (not including the extra long one used for sewing) OR just tuck them underneath the flower and hide them when you sew on the flower.
Assembly
Sew the first flower onto the tip of the dragon’s tail. Weave the leftover yarn to the side of the flower facing the front of the dragon and leave it to make the spikes later.
Sew the second flower onto Rounds 29-31. Weave the leftover yarn to the side of the flower facing the front of the dragon and leave it to make the spikes later.
Sew the third flower onto Rounds 23-25. Weave the leftover yarn to the side of the flower facing the front of the dragon and leave it to make the spikes later.
Sew the fourth flower onto Rounds 12-14 in between the horns. Weave the leftover yarn to the side of the flower facing the front of the dragon and leave it to make the spikes later.

Spikes
Starting from the flower on the tail, use the yarn leftover from sewing and make a slip knot as close to the flower as possible.
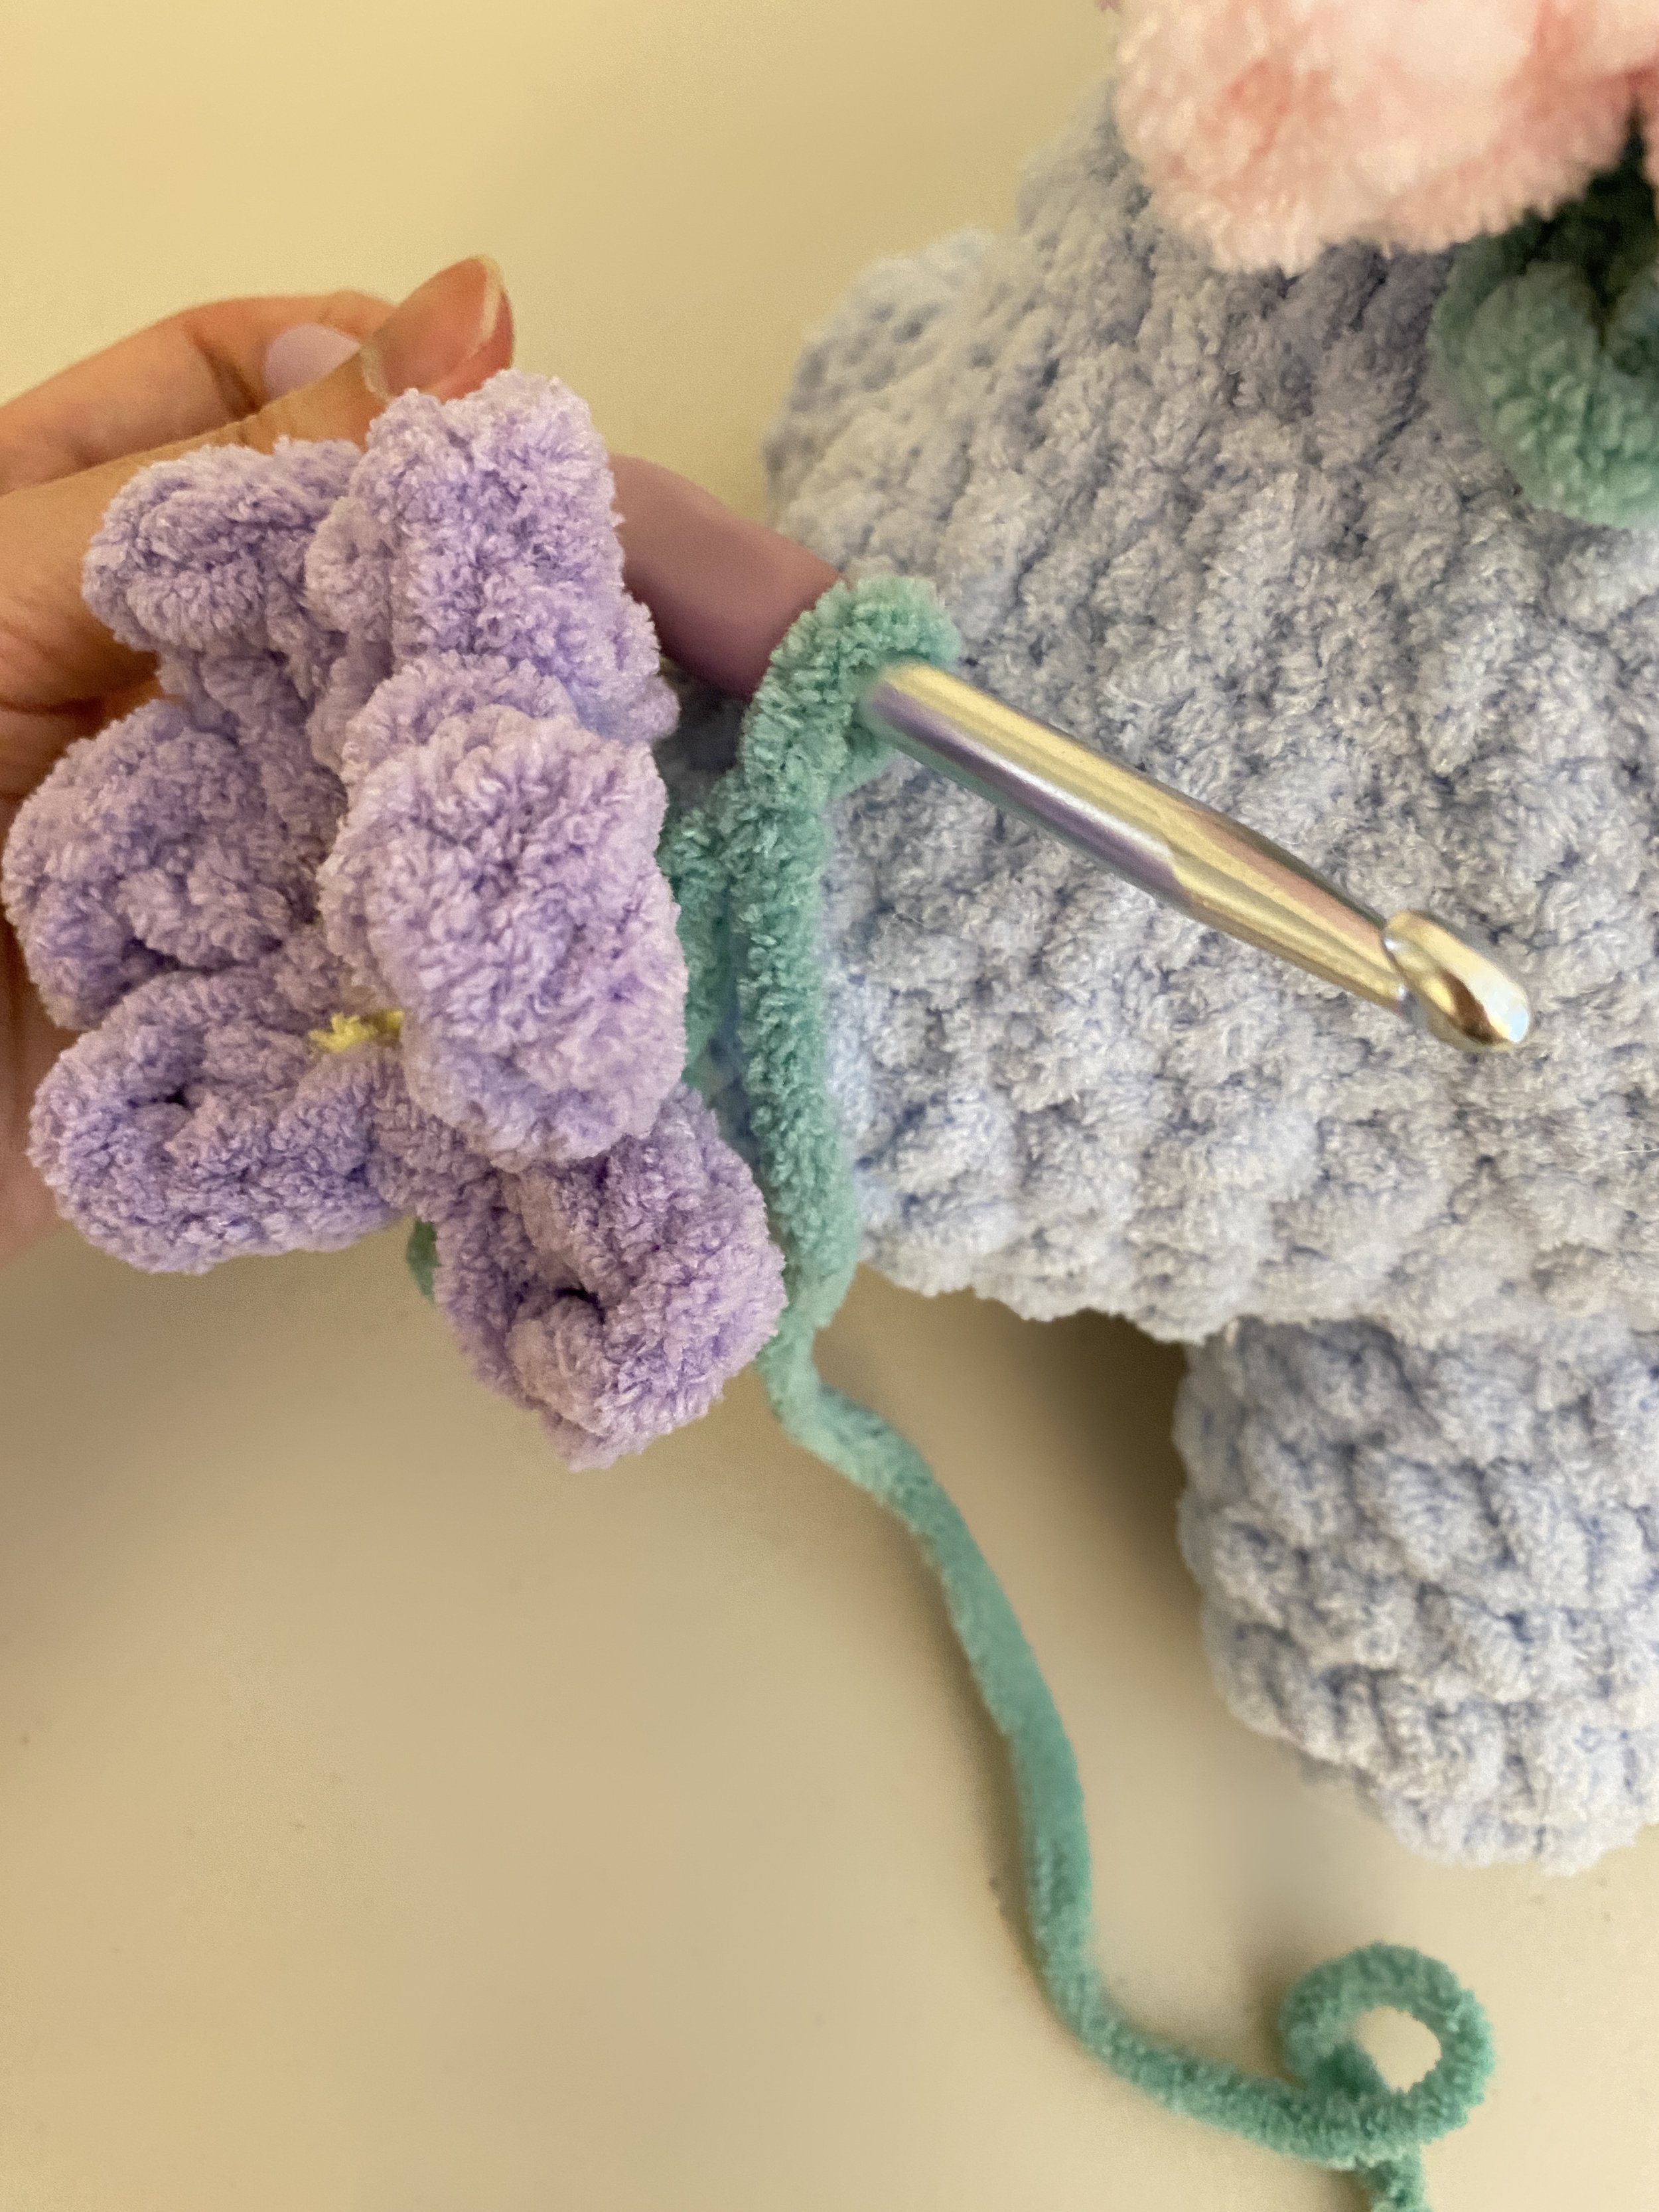
Follow the original baby dragon pattern on how to crochet the spikes onto the dragon’s base (SL ST, CH 2, DC) and repeat until you reach the next flower.

Weave in the ends.
Do this with each flower until you reach the flower on the head.
For the flower on the head, do one set of SL ST, CH 2, DC , SL ST down the face of the dragon.
FO and weave in the yarn tails.

Wings (adjusted placement)
Sew on the wings 4 stitches away from the spikes to give more room for the flowers.
Follow the rest of the original baby dragon pattern as written to finish the dragon!
Thank you so much for following along with my modification pattern! I hope you enjoyed making this spring dragon!
As always, if you have any questions or find any mistakes, please don’t hesitate to let me know.
I absolutely love seeing your work! Tag me in photos/videos of your finished pieces on any of my socials.
Instagram, Tik Tok, YouTube: @themaryjay
Want to make a strawberry dragon? Check out this mod guide that’s also based on the same baby dragon pattern!
