
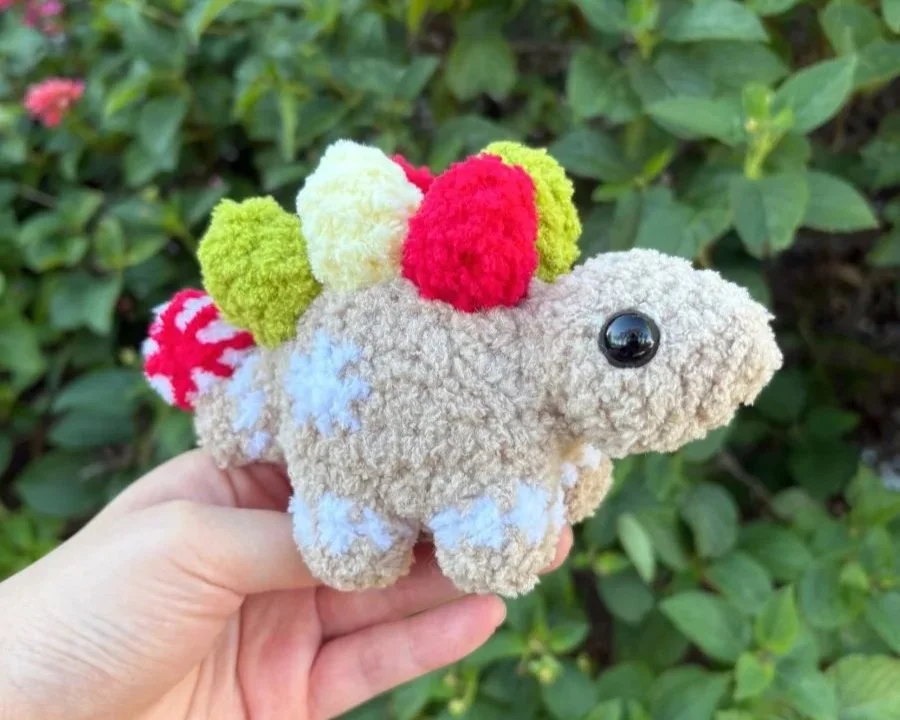
Crochet Gingerbread Stegosaurus Pattern
Topped with a peppermint and gumdrop spikes, this gingerbread stegosaurus makes an adorable Christmas project. Here’s how to crochet it!
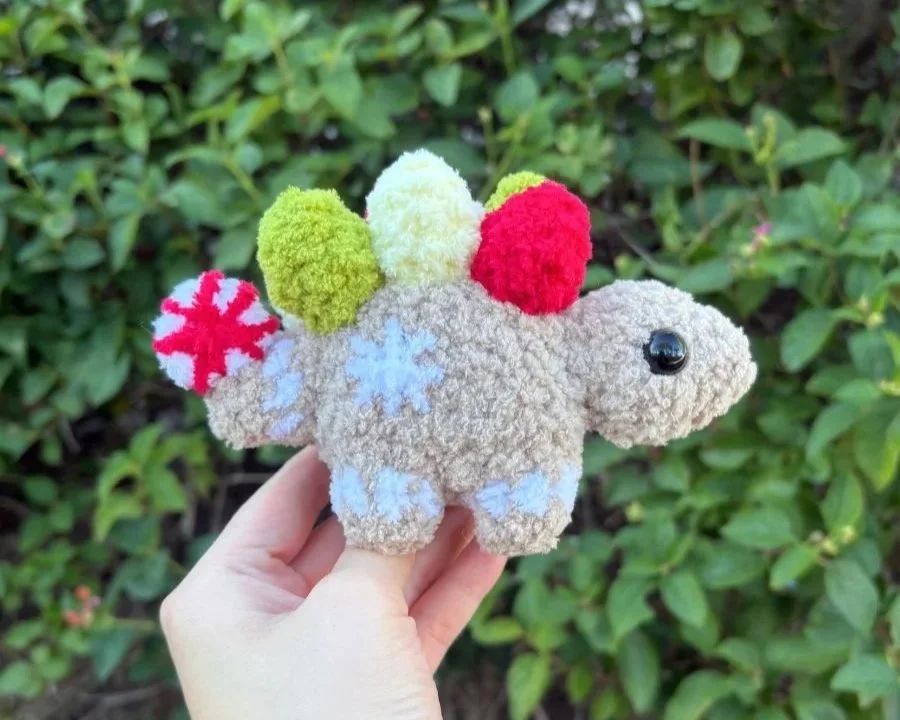
After making the little long neck dinosaur and baby T-rex, it was time to make a little stegosaurus. But since it’s also Christmas time, why not make it Christmas-themed?
One of my favorite Christmas memories is decorating gingerbread houses. Inspired by this cute tradition, I set off to create a gingerbread dinosaur.
This time, I used a thinner yarn, smaller hook, and a “yarn under” single crochet method, creating tighter stitches and shrinking the size even more than my previous little dinosaurs. Note: While “yarn under” is often recommended for amigurumi, you can definitely use whichever method you prefer to make this dinosaur.
So while my stegosaurus appears smaller than my long neck dino and T-rex, this stegosaurus actually uses more stitches to make the legs, the tail, and certain parts of the body.

The size difference is largely due to the different yarn and hook size used for the stegosaurus. Using the same yarn and hook, the stegosaurus will likely be more similar (and in some ways, larger) than the other two dinosaurs. Find the long neck dino pattern here and the pumpkin t-rex pattern here.
Let’s talk Yarn . . .
For this stegosaurus, I used Alize Softy Plus, instead of my usual go-to, Bernat Blanket.
For a while, every time I spotted a plushie with a yarn texture I loved, it turned out to be “Alize Softy Plus.” So I made it my mission to get my hands on it — and when I finally did, it did not disappoint.
I love the fuzzy texture even more than Bernat Blanket. It’s soft, glides smoothly on the hook, and sheds very little for a fuzzy yarn. It’s thinner than Bernat Blanket and creates smaller plushies.
However, the stitches are a bit harder to see. While not impossible, I found it difficult to crochet with the first time I used it for my Honey Bear Pattern. See the video of the first time I tried using this yarn. But this time, it was so much easier with the stegosaurus.
The only real downside is that it was a bit tricker to get my hands on this yarn.
I’m in the United States and was not able to find it readily available in stores. Different online sites sold it, but since it’s from Turkey, it usually came with high overseas shipping costs. Plus, I was unfamiliar with many of these sites and unsure of the one to use.
In the end, I got mine from an Etsy shop that offered “free shipping when you spend $35+.” The good reviews and my familiarity with Etsy (Etsy’s Purchase Protection) made me feel more comfortable with purchasing it.
Disclaimer: The following are affiliate links, which means I may earn a small commission at no extra cost to you if you choose to use them to make a purchase. This is one way that helps support me and allows me to continue creating free content for you.
If you’re interested in the shop, you can find that Etsy shop here. As for other materials, you can usually find them in a craft store and I also put my favorites on my Amazon Storefront.

Yarn comparison: Alize Softy Plus, Premier Parfait Chunky, vs Bernat Baby Blanket.
Changing up the Yarn or Hook Size
Regardless of what I used, you can definitely switch up the yarn or hook size based on what you have available or your preference.
If you are using a different yarn or hook size, don’t forget to make sure that the yarn and hook size work well together. For amigurumi, it’s often recommended to use a hook size that is 1-2mm smaller than the recommended hook size on the yarn label for tighter stitches and less holes in your project. However, different crocheters have their own preferences on hook size and you are welcome to follow your own preference.
Remember, the plushie may vary in size with different yarn and hook sizes.
Now let’s get into the Pattern . . .
This pattern is designed to be crocheted in continuous rounds (or spirals) unless otherwise mentioned. You can also find a PDF version of this pattern on Patreon.

Terms of Use:
Please do not copy, sell, or duplicate (to distribute) the contents of this crochet pattern in any format without permission. If you’d like to share this pattern, I’d really appreciate it if you could share where to find this blog post as this helps me continue to make free patterns for you!
You may sell the plushies you make using my patterns, but please give pattern credit to The Mary Jay and link back to this post whenever possible.
Skills and Abbreviations (In U.S. terms)
MR = Magic Ring (Magic Circle)
SC = Single Crochet
SL ST= Slip Stitch
INC = Increase
DEC = Decrease
BLO = Back Loop Only
FO = Fasten off
R= Round
Change Color
Recommended Materials:
(Based on what I used to make the dinosaur in the sample photos)
Alize Softy Plus Yarn in Brown, White, Red, Yellow, and Green
Two 12 mm Safety Eyes (Warning: Safety eyes can be choking hazards and are generally not recommended when crocheting plushies for young children/pets. You can replace the “safety eyes” with an alternative.)
4 mm Crochet Hook
Two 12 mm Safety Eyes
Stuffing
Yarn Needle
Scissors
Stitch Markers (Optional)
Pins (Optional)
-
Yes! Just like the yarn and hook size, the safety eyes listed are just what I used to make the plushie in the sample photo. Feel free to use a similar eye size or switch it up with felt, buttons, or even just embroider it with yarn.
Please note that safety eyes can be choking hazards and are not recommended for plushies made for young children or pets.
Tail:
Using Brown
R1: 4 SC in a MR (4)
R2: [SC, INC] x 2 (6)
R3: [2 SC, INC] x 2 (8)
Change Color to White
R4: 8 SC (8)
Change Color to Brown
R5: 8 SC (8)
SL ST into the first stitch.
FO leaving a tail. Add stuffing.
Hide the yarn tail inside or you can use it to help sew closed any gaps between the tail and the body later. We’ll be attaching the tail during R5 of the body.
Legs: (Make 4)
Using Brown
R1: 8 SC in a MR (8)
R2: 8 SC (8)
Change Color to White
R3: 8 SC (8)
SL ST into the first stitch.
FO leaving a tail.
Hide the tail inside or you can use it to help sew closed any gaps between the legs and the body later. We’ll be attaching the legs during R2 of the body.
Body:
Using Brown
R1: 12 SC in a MR (12)
R2: 1 SC,
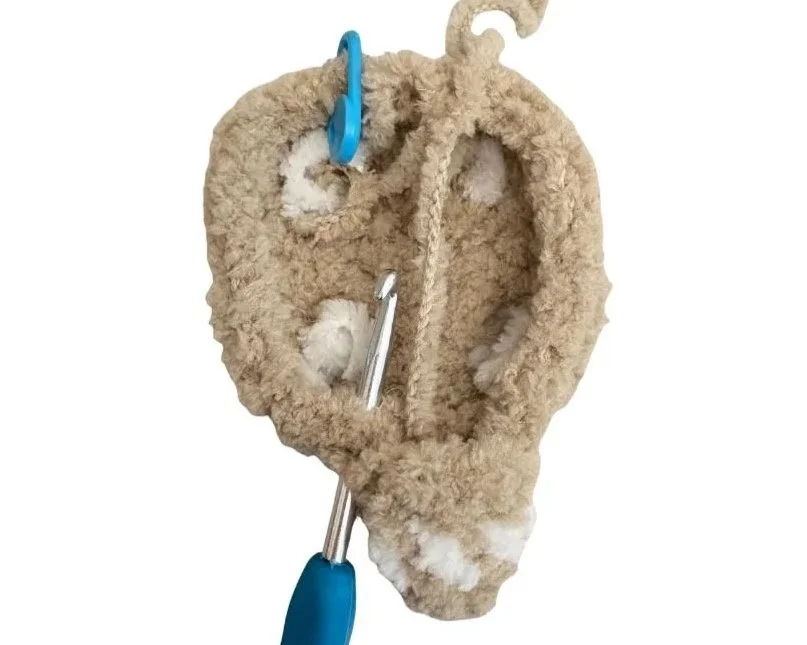
We’ll now be attaching the legs to the body. When indicated, line up the first and last stitch of each leg to the next two stitches of the body. Insert the hook from the inside to the outside of the leg and then through the body before SC them together. The rest of the stitches are crocheted just like normal along the round of the body.
Working through the first leg and body: 2 SC
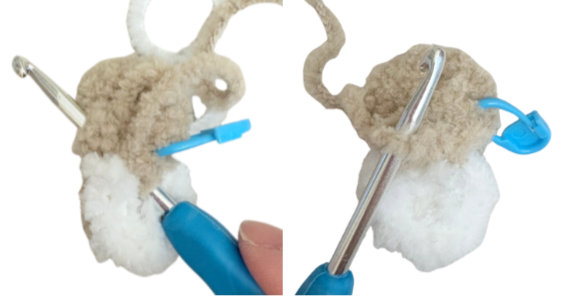
R1: Crocheting the first leg to the body (Picture Reference). Tip: It might be easier to see the stitches in the reference pictures of my long neck dino pattern. The legs and tail use a similar method of attachment.
Continue working in the body only: 1 SC
Working through the second leg and body: 2 SC
Continue working in the body only: 1 SC
Working through the third leg and body: 2 SC
Continue working in the body only: 1 SC
Working through the fourth leg and body: 2 SC (12)

R1 (Picture Reference)
We’ll now be crocheting along the outside of the legs, ignoring the stitches that connected the legs to the body.
R3: 1 SC, 6 SC (around the outside of the leg), 1 SC, 6 SC (around the outside of the leg), 1 SC, 6 SC (around the outside of the leg), 1 SC, 6 SC (around the outside of the leg) (28)
R4: [6 SC, INC] x 4 (32)
R5: 14 SC,
Then similarly to R2, line up four stitches of the tail to the next four stitches of the body. Attach the tail to the body by making 4 SC through both the tail and the body.
Continue working along the body and make 14 SC (32)
Note: Sometimes stitches can shift differently for different crocheters. Check to make sure that the tail is centered to the back of your dino and adjust the tail placement if necessary.
R5: Crocheting the tail to the body (Picture Reference)
In the next round, we’ll now be crocheting along the outside of the tail, ignoring the stitches that connected the tail to the body.
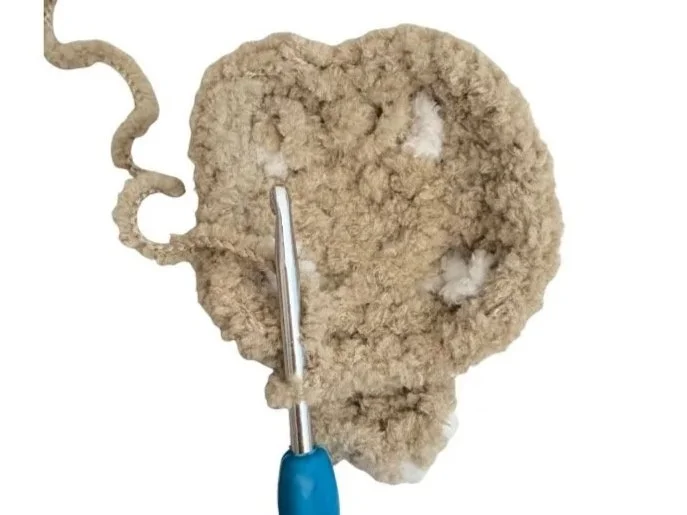
R6: 14 SC, 4 SC (around the outside of the tail), 14 SC (32)
R6 (Picture Reference)
Add stuffing to the legs. If there’s still little gaps between the legs and the body or the tail and the body, use the leftover yarn from fastening off the legs/tail to sew the gaps closed.
R7: [6 SC, DEC] x 4 (28)
R8: [5 SC, DEC] x 4 (24)
R9: [4 SC, DEC] x 4 (20)
R10: [3 SC, DEC] x 4 (16)
R11: [DEC] x 8 (8)
FO leaving a tail. Add stuffing.
Use the yarn tail to sew the plushie closed.

Head:
Using Brown
R1: 4 SC in a MR (4)
R2: [INC] x 4 (8)
R3: 8 SC (8)
R4: [SC, INC] x 4 (12)
R5: [2 SC, INC] x 4 (16)
R6-7: 16 SC (16) 2 Rounds
R8: [DEC] x 8 (8)
FO leaving a long tail for sewing.
Attach the eyes between rounds 5 and 6.
Add stuffing.
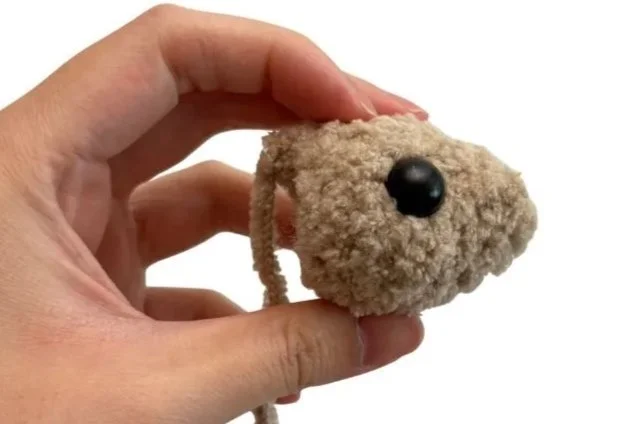
Sew the head onto the front of the body across from the tail.

Gumdrops: (Make 6)
Using Red, Yellow, or Green
R1: 6 SC in a MR (6)
R2: [2 SC, INC] x 2 (8)
R3-4: 8 SC (8) 2 Rounds
FO leaving a long tail for sewing. Lightly stuff.
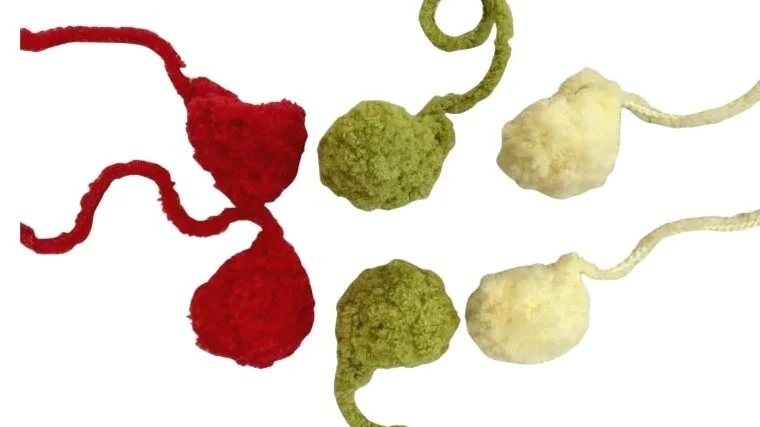
Sew the gumdrops in rows of three right next to each other on top of the body.
Tip: Use pins to help position the gumdrops.
Optional: Using White, embroider a snowflake on the side.
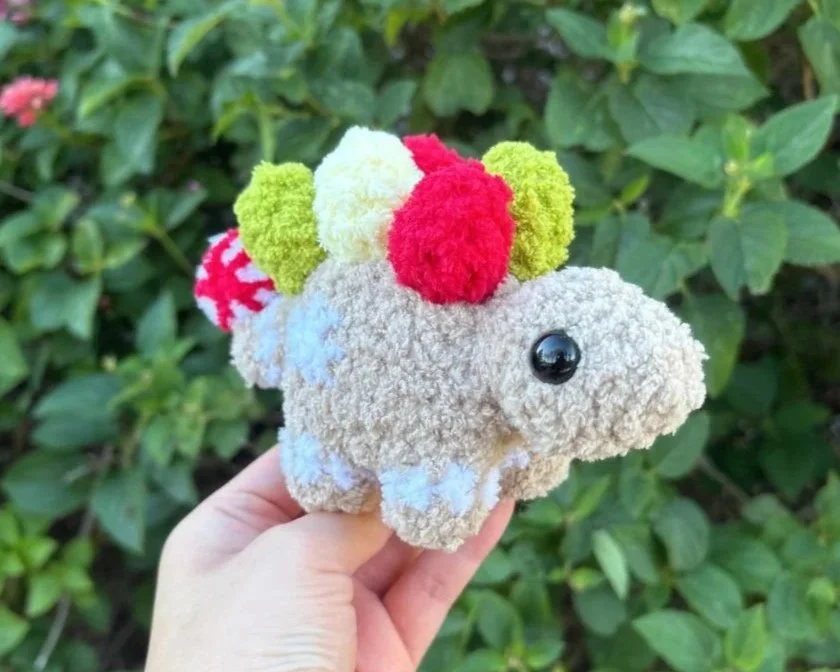
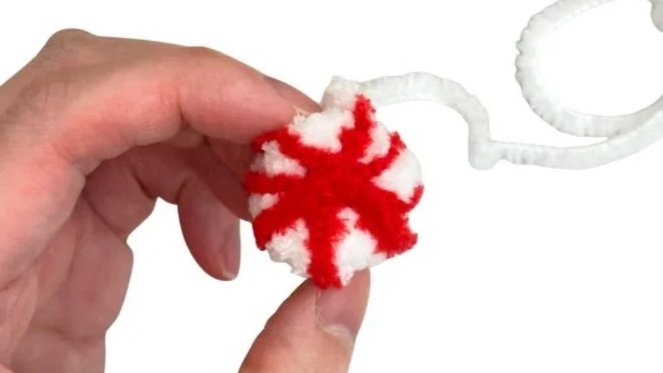
Peppermint:
Using White
R1: 7 SC in a MR (7)
R2: In BLO, 7 SC (7)
R3: In BLO, 7 SC (7)
FO leaving a tail. Lightly stuff.
Use the yarn tail to sew the opening closed.

Adding the Peppermint Stripes (Picture Reference)
Using Red, wrap the yarn around the peppermint. Crisscross the yarn (as shown in the picture), then wrap the yarn to the other side and repeat a few times in different angles to create the stripes.
If creating multiple stripes with one strand of yarn is difficult, you can use separate strands instead. Although I recommend at least making one crisscross to hold the yarn more securely in place.
When finished, tie off the yarn ends and tuck them inside of the peppermint. I tied mine in the center, but I would recommend doing this on the side that will be sewn against the dinosaur to fully cover them.
Note: If needed, you can try using a small amount of fabric glue or low-temp hot glue to help hold the stripes in place. Use a tool to apply it safely and precisely. Hot glue can burn, so be careful not to touch it with your hands.
Make a bigger stegosaurus?
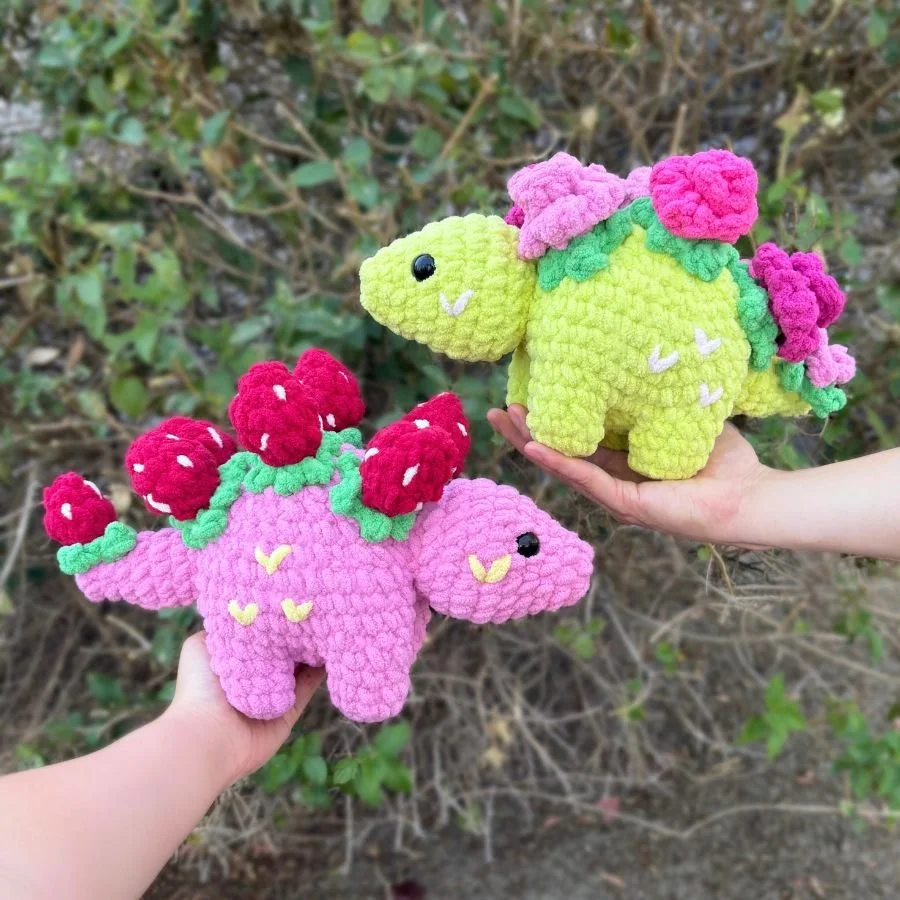
Check out my 2-in-1 Strawberry and Flower Stegosaurus pattern!
Ready for your next project? Find more Christmas crochet projects here and more free patterns here !
You can also find more patterns in my shop or on my Patreon!